8x Superresolution with Stable Diffusion XL and Tile Controlnet
Click here to send an edit suggestion
 UltraSharpV2 & then Stable Diffusion XL + SDXL Union Promax Controlnet in Tile mode produces a passable 8x Superresolution option for free. The SDXL checkpoint fixes small details like faces, hair, fur, greenery and occasionally removes some noise, but it also removes too much fine detail in some cases and changes colors in other cases. Workflows: with Florence2 & CLI (Command Line Interface)P vision or without . Or just drag & drop one of the two images into ComfyUI.
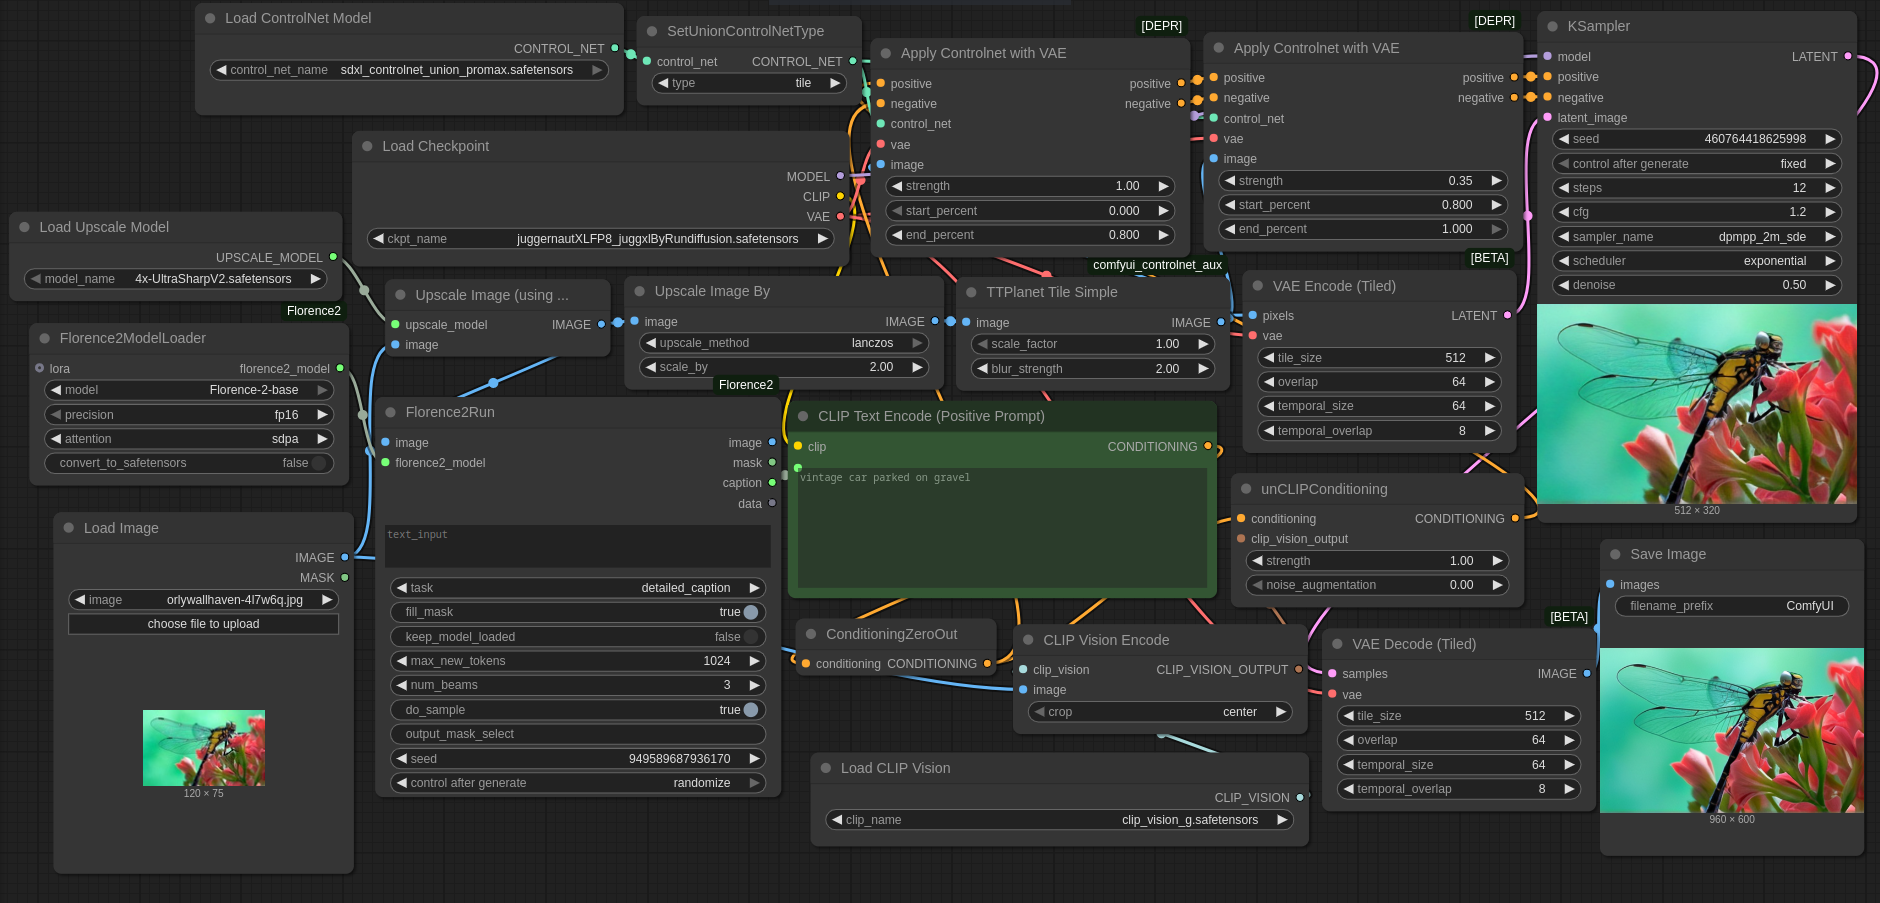
Following up on my comparison of free superresolution options , I have a ComfyUI workflow for 8x Superresolution using only free tools. It uses a Stable Diffusion XL checkpoint + SDXL Union Promax Controlnet in Tile mode and optionally Florence2 & CLI (Command Line Interface)P Vision G. Without Florence2, you need a prompt and thus it's only semiautomatic.
Related to my previous article comparing free superresolution options , I want to present a ComfyUI workflow for 8x Superresolution using only free tools. This workflow uses an arbitrary Stable Diffusion XL checkpoint together with the SDXL Union Promax Controlnet in Tile mode and optionally Florence2 & CLI (Command Line Interface)P Vision G. The version using Florence2 & CLI (Command Line Interface)P Vision G uses much more RAM (random access memory)/VRAM (random access memory), but can be used completely automatically. The version without Florence2 & CLI (Command Line Interface)P Vision requires specifying a prompt and thus is just semiautomatic.
The main work is done by UltraSharpV2 , but its output is further 2x Lanczos upscaled and then sent to Stable Diffusion XL + Tile Controlnet for further refinement. The SDXL checkpoint fixes small details like faces, hair, fur, greenery and occasionally removes some noise, but it also removes too much fine detail in some cases and changes colors in other cases
The main work is done by UltraSharpV2 , the winner of my previous comparison, but its output is further 2x Lanczos upscaled and then sent to Stable Diffusion XL + Tile Controlnet for further refinement. Using just UltraSharpV2 or just SDXL+Controlnet for 8x will probably not work well. 4xUltraSharpV2 alone produces output that is too blurry and too artifact-riddled. Sending its output into UltraSharpV2 again for further upscaling would have too little detail for good upscaling in some areas and would amplify artifacts in others. SDXL can potentially fix the artifacts, but 8x upscaling using just SDXL would require a high denoise value which encourages SDXL to change the image so much that it just barely resembles the input. Tile Controlnet keeps this tendency somewhat in check, but mostly cares about large scale similarity to the input, allowing SDXL to change small details as it sees fit. For example it would allow SDXL to completely replace the fabric pattern of clothing or remove/add jewelry. UltraSharpV2 with SDXL combines the best of both worlds: it stays close to the input, but fixes some of the artifacts in UltraSharpV2's output and/or sharpens it.
Don't expect miracles. In many images, there is hardly any change relative to UltraSharpV2. In other images, the difference is obvious.
You should not expect miracles and in many images, there is hardly any change relative to UltraSharpV2 visible. But in other images, the difference is obvious. Given the amount of extra pixels 8x upscaling produces, it should not be surprising that output can not stay close to input while also looking realistic without hallucinating detail, as too much information has to be guessed (e.g. the eye color of an 8x8 pixel face upscaled to 64x64 has to be guessed, because it is impossible to tell in the input). For the best results, an SDXL-compatible checkpoint that understands the input should be used (i.e. for manga input a manga-focused checkpoint, for photos a realistic checkpoint) . All SDXL-compatible checkpoints should work in principle. In some cases, it might makes sense to load a LoRA that specializes in a particular subset of images. Given that LoRAs can be trained on a moderately sized set of images, this enables reconstructing low resolution images if similar high-resolution images are available.
Careful, the linked image is gigantic. But if you want to see the differences clearly, you have to look at it. This preview loses too much detail.

Careful, the linked image is gigantic. But if you want to see the differences clearly, you have to look at it. This preview loses too much detail.
You are free to play around with the parameters, but I couldn't find any values producing significantly better output. Florence2 sometimes produces nonsense prompts, be careful.
As you can see, postprocessing with SDXL + Tile Controlnet mainly improves faces, hair, fur, greenery and occasionally removes some noise, but it also removes too much fine detail in some cases and changes colors in other cases (like the color of the eyes of the navigator in the Dune movie poster) .
Ideas for improvement: Using a tiled sampler would reduce VRAM (random access memory) usage for large images. A finetuned SDXL checkpoint and/or sampling process and/or different Controlnet might improve output quality.
Here are some obvious ideas for improvement: First, using a tiled sampler would reduce VRAM (random access memory) usage for large images. Second, there is no denoise setting that leads to an optimal output. Lower denoise leads to essentially no change, making SDXL postprocessing pointless. Higher denoise leads to more artifacts being corrected, but the deviation from the input becomes too obvious. Ideal would be a finetuned SDXL checkpoint and/or sampling process and/or different Controlnet such that adherence to the low resolution input is enforced strongly at all denoise strengths, but changing of high-frequency detail is allowed and encouraged. I assume that the image generation process of standard SDXL simply does not temporally separate generation of low-resolution and high-resolution detail enough. I also tried SD1.5, Flux.1 and possibly some other diffusion models, but they all behave similarly: High denoise leads to deviation from the input, low denoise changes too little detail to fix all artifacts.
You are of course free to play around with the denoise strength, number of steps and Controlnet parameters to improve the output, but after fiddling with them for quite some time, I couldn't find any values producing significantly better output. Also be careful with Florence2: It produces passable prompts most of the time, but sometimes produces nonsense, so a hand-written prompt might be better. You could also try "an image", "a photograph" or nothing at all as prompt if you want to get around the Florence2 requirement without losing automation, but some of the output images are likely to contain low or incorrect detail if you do that.
Example of lowered Controlnet strength, increased number of steps and higher denoise value:
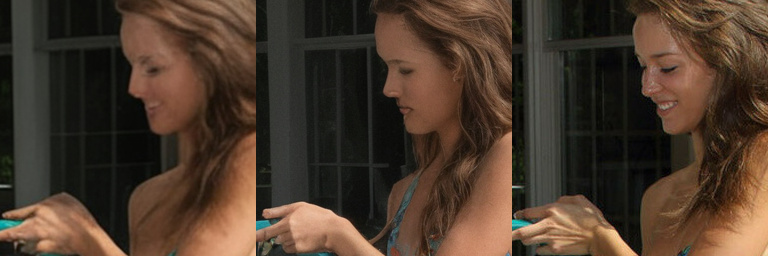
One example of lowered Controlnet strength, increased number of steps and higher denoise value (the default on the left, with lower Controlnet strength in the middle, ground truth on the right) :
Clearly there is more detail, but also a lot of hallucination.
Clearly there is more detail, but also a lot of hallucination. You definitely won't get closer to the ground truth with these settings. If you only care about something that looks decent, not something that's close to the original, then these changed settings might be useful for you.
I cropped the resulting images for easier comparison. If you want to evaluate the uncropped images, download all results . This file only contains the UltraSharpV2 and Tile Controlnet images, for the remaining files plus scripts for recreating the comparison image, look at the download link in my previous article .
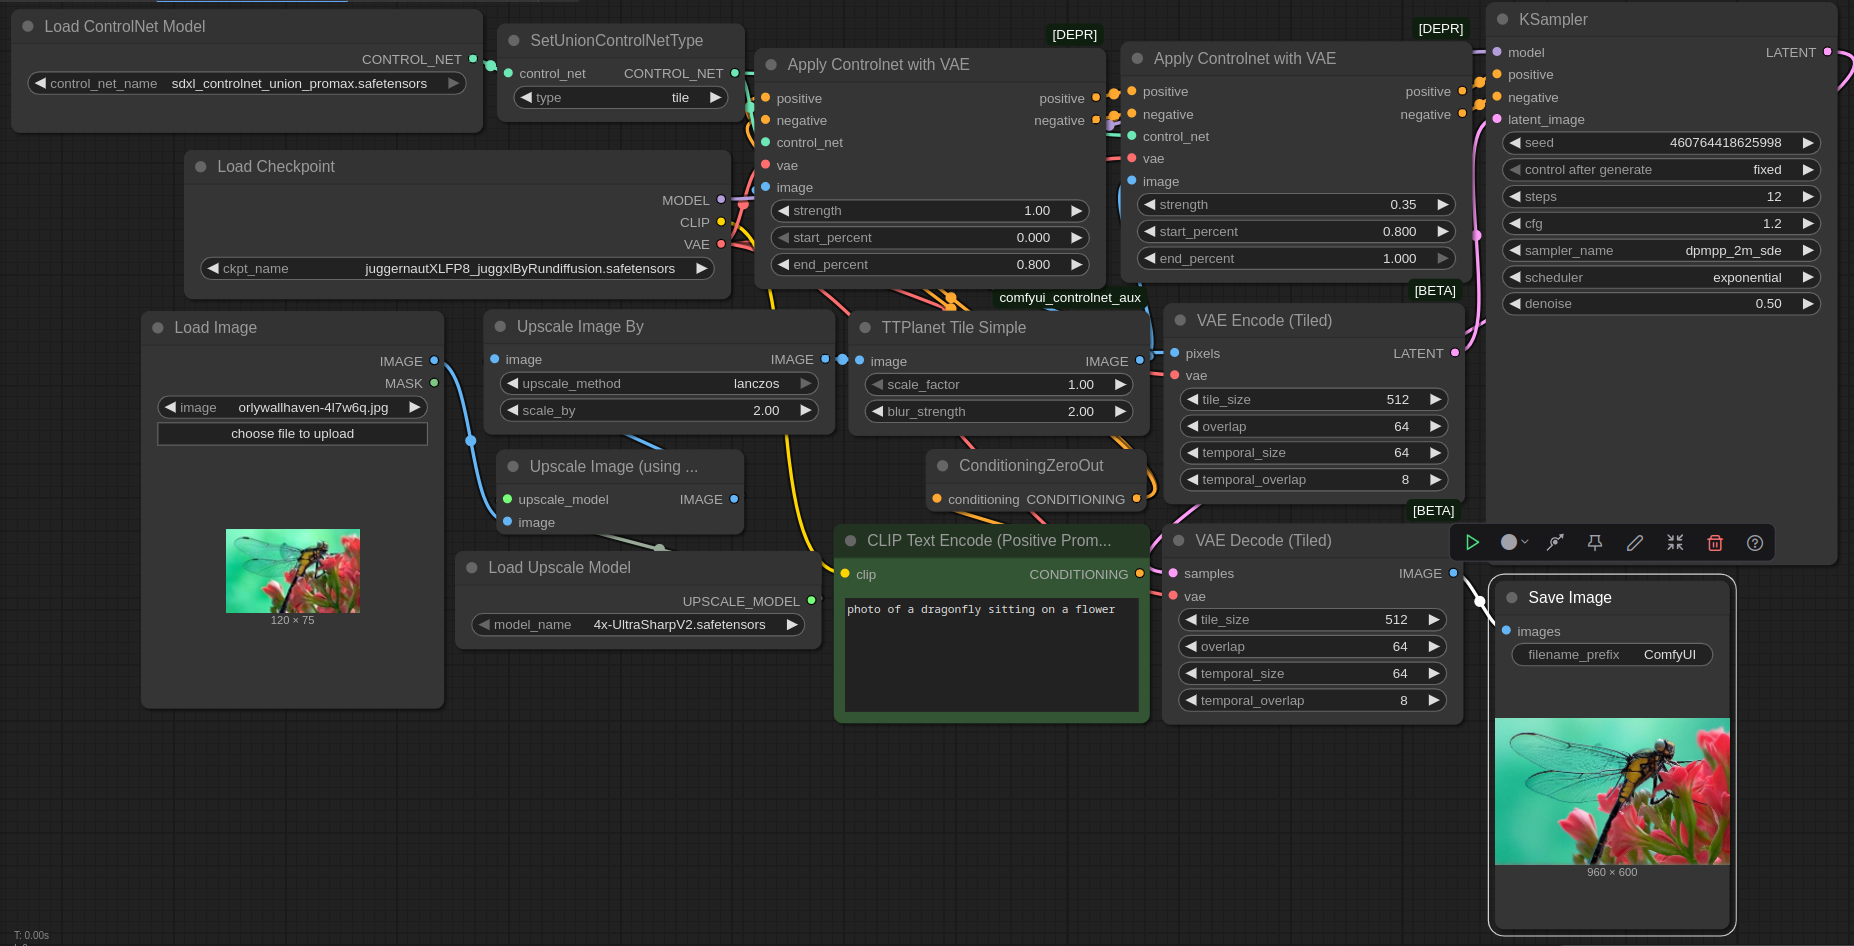
If you want to use the workflow, you can either drag & drop the image at the top or the image below into ComfyUI, or you can just download it here: with Florence2 & CLI (Command Line Interface)P vision or without the extras . I tested it only with ComfyUI commit 0963493a9c3b6565f8537288a0fb90991391ec41 , but I'm sure it will work with other commits. Apart from standard ComfyUI, I used a node from https://github.com/Fannovel16/comfyui_controlnet_aux . For the larger workflow, you also need https://github.com/kijai/ComfyUI-Florence2 . And you also need models, i.e. the neural networks: clip_vision_g.safetensors , Florence-2-base (although I believe Florence2 requires Huggingsface's annoying autodownload feature) , 4x UltraSharpV2 , SDXL Union Promax Controlnet , Juggernaut XL (version Jugg XI) .
If you want to use the workflow, you can either drag & drop the image at the top or the image below into ComfyUI, or you can just download it here: with Florence2 & CLI (Command Line Interface)P vision or without the extras . I tested it only with ComfyUI commit 0963493a9c3b6565f8537288a0fb90991391ec41 , but I'm sure it will work with other commits. Apart from standard ComfyUI, I used a node from https://github.com/Fannovel16/comfyui_controlnet_aux . For the larger workflow, you also need https://github.com/kijai/ComfyUI-Florence2 . And you also need models, i.e. the neural networks: clip_vision_g.safetensors , Florence-2-base (although I believe Florence2 requires Huggingsface's annoying autodownload feature) , 4x UltraSharpV2 , SDXL Union Promax Controlnet , Juggernaut XL (version Jugg XI) .
PS: I tried again using IPAdapter in place of Florence2 & CLI (Command Line Interface)P Vision G, but there wasn't much visible difference.
PS: I tried again using IPAdapter Advanced with ip-adapter-plus_sdxl_vit-h.safetensors and CLI (Command Line Interface)P-ViT-H-14-laion2B-s32B-b79K.safetensors in place of Florence2 & CLI (Command Line Interface)P Vision G, but there wasn't much visible difference. In fact, not using either of those options and just using empty prompts seems to be fine in most cases. Also, using CFG 1.0 instead of CFG 1.2 seems to be fine as well and leads to the usual 2x speedup. It shouldn't be surprising, because we are reconstructing only small details and CFG shouldn't be necessary for that.
Click here to send an edit suggestion
Written by the author; Date 24.02.2026; Updated 17.06.2026; © 2026 spinningsphinx.com
- Mocking
- Sarcasm, e.g. "Homeopathy fans are a really well-educated bunch"
- Statement not to be taken literally, e.g. "There is a trillion reasons not to go there"
- Non-serious/joking statement, e.g. "I'm a meat popsicle"
- Personal opinion, e.g. "I think Alex Jones is an asshole"
- Personal taste, e.g. "I like Star Trek"
- If I remember correctly
- Hypothesis/hypothetical speech, e.g. "Assuming homo oeconomicus, advertisement doesn't work"
- Unsure, e.g. "The universe might be infinite"
- 2 or more synonyms (i.e. not alternatives), e.g. "aubergine or eggplant"
- 2 or more alternatives (i.e. not synonyms), e.g. "left or right"
- A proper name, e.g. "Rome"